
info@textilvpego.com Textil Villa de Pego, S.L. info@textilvpego.com
AGROPET cable de poliéster
AGROPET®

It is installed with the same tools as wire —gripples, pulleys and tensioners— but ties by hand and does not cut

. Follow these 5 steps or download the complete manual. ⬇ Download manual (PDF)View the steps

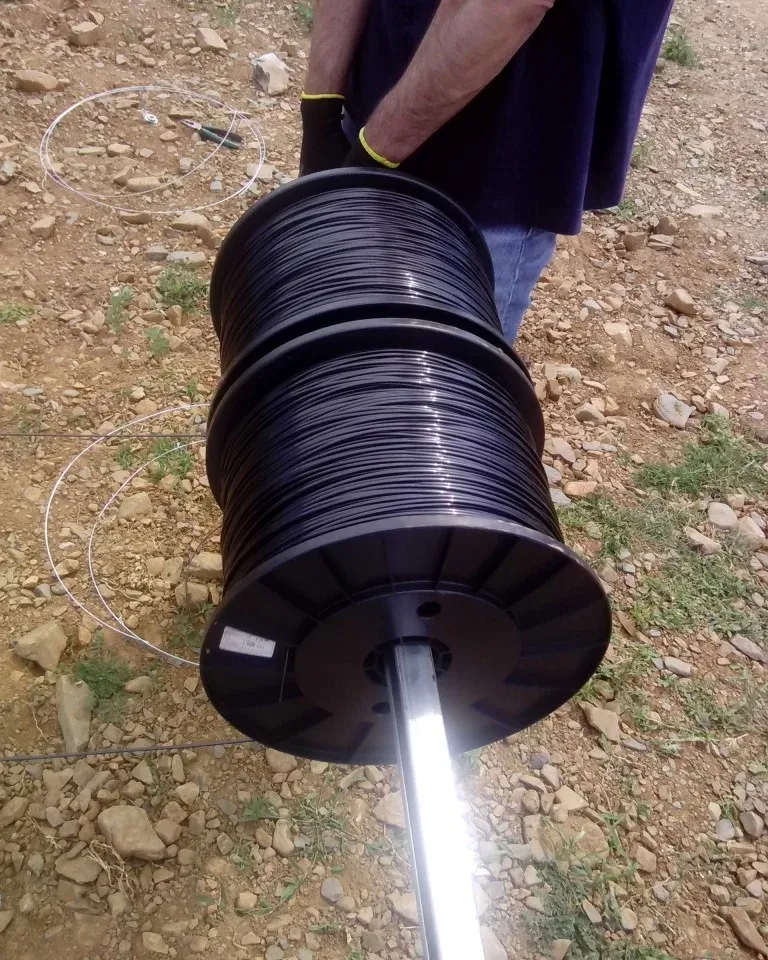
Desenrollado de una bobina de cable AGROPET en el campo
ISO 9001 and ISO 14001 certification — Bureau Veritas

Paso a paso

Uncoil the reel

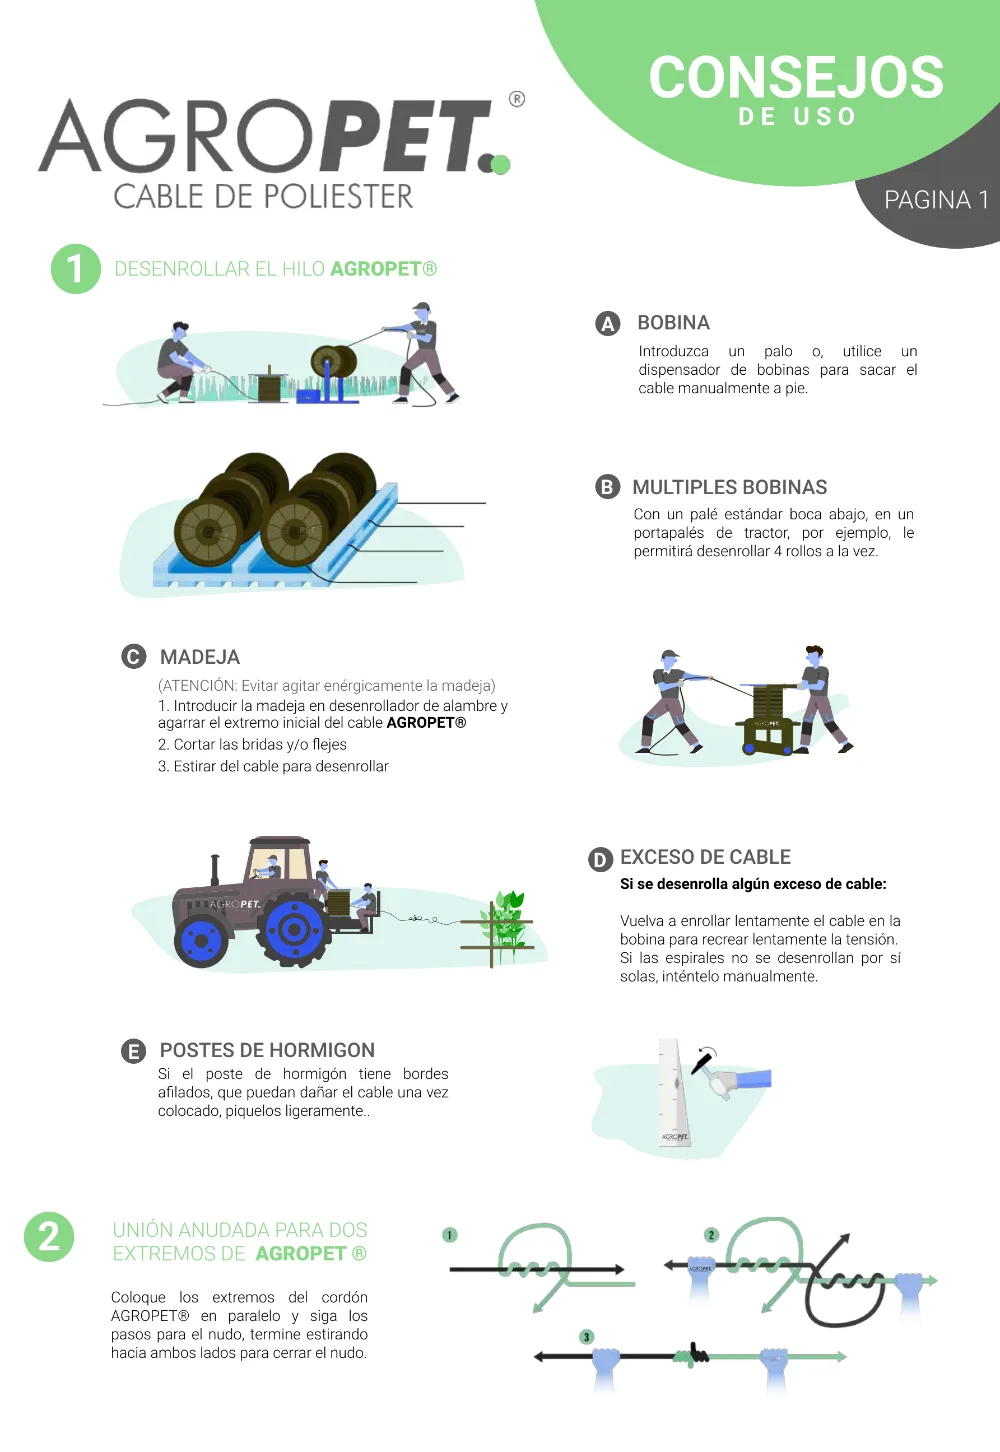
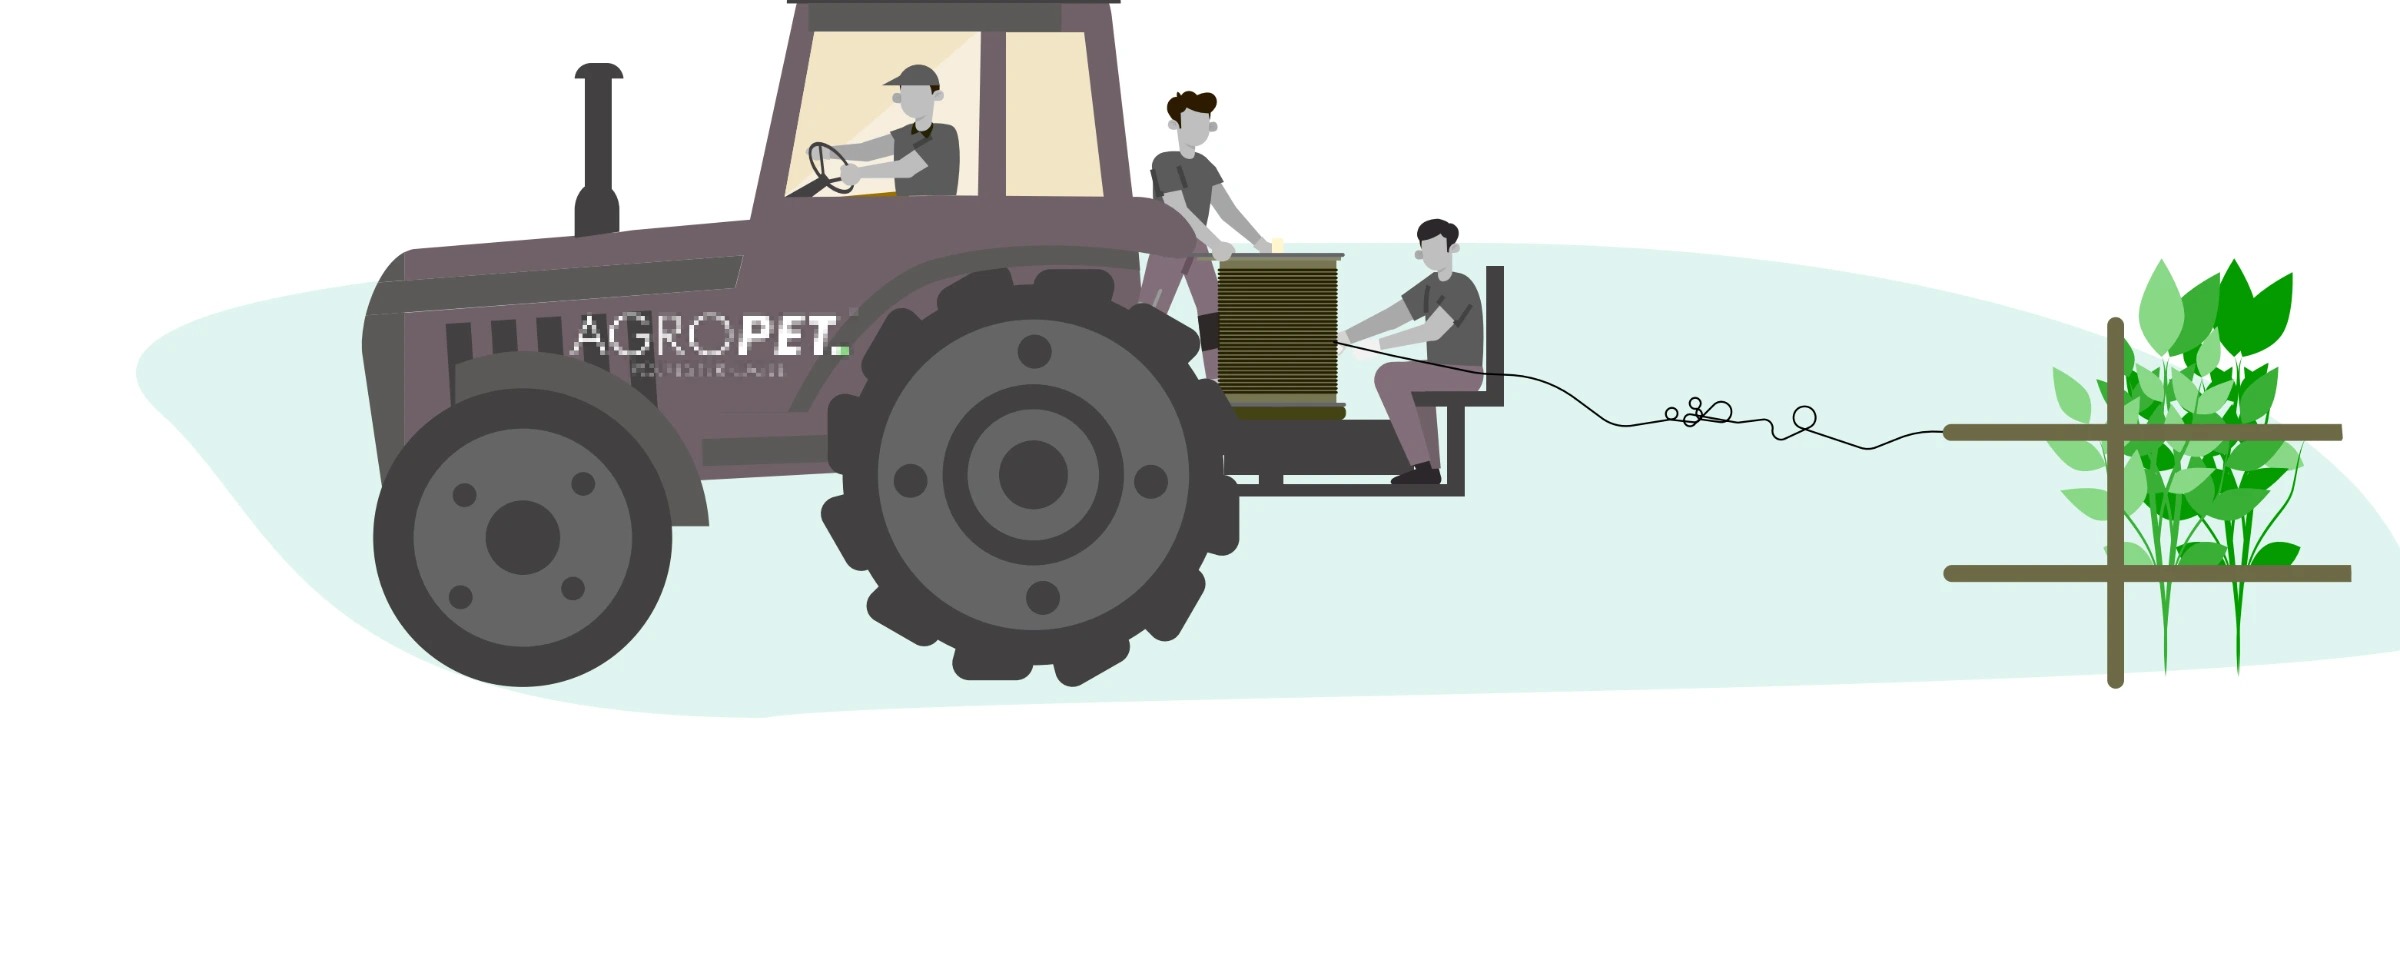
Diagrama: desenrollar las bobinas con un portapalés de tractor
1

4 reels at a time

Do not shake the coil vigorously. If excess cable comes out, re-coil it slowly to recover tension..

  • If the concrete post has sharp edges, chip them lightly to avoid damaging the cable.
  • Si sale exceso de cable, reenróllalo despacio para recuperar la tensión.
  • Tension to 1%
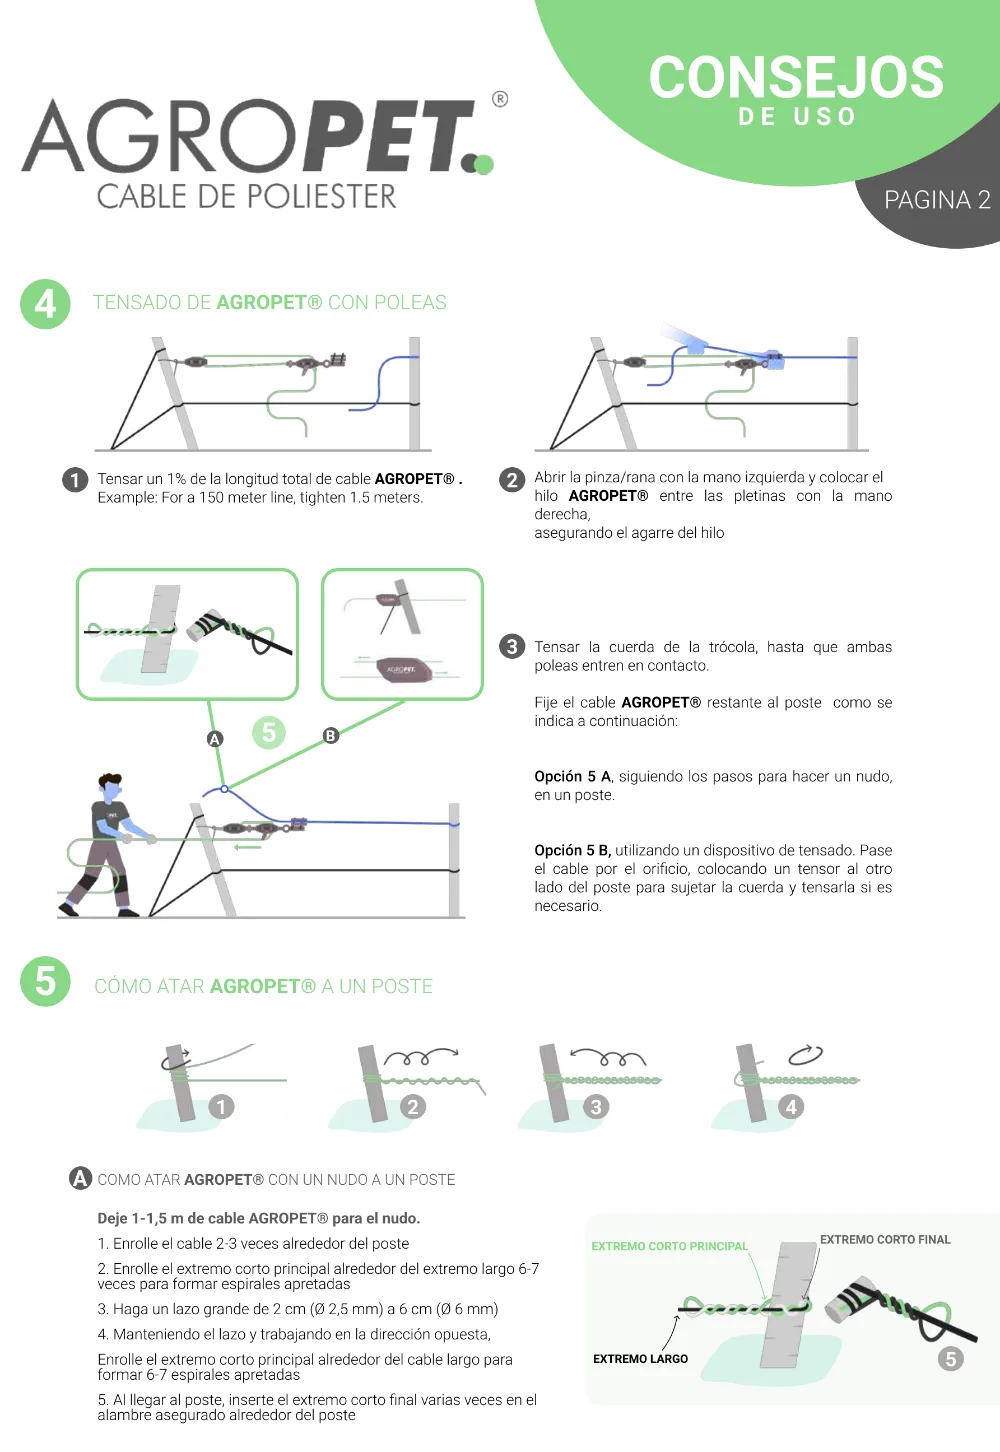
Diagrama: tensado de AGROPET con poleas (trócola) entre dos postes
2

1% of the line length

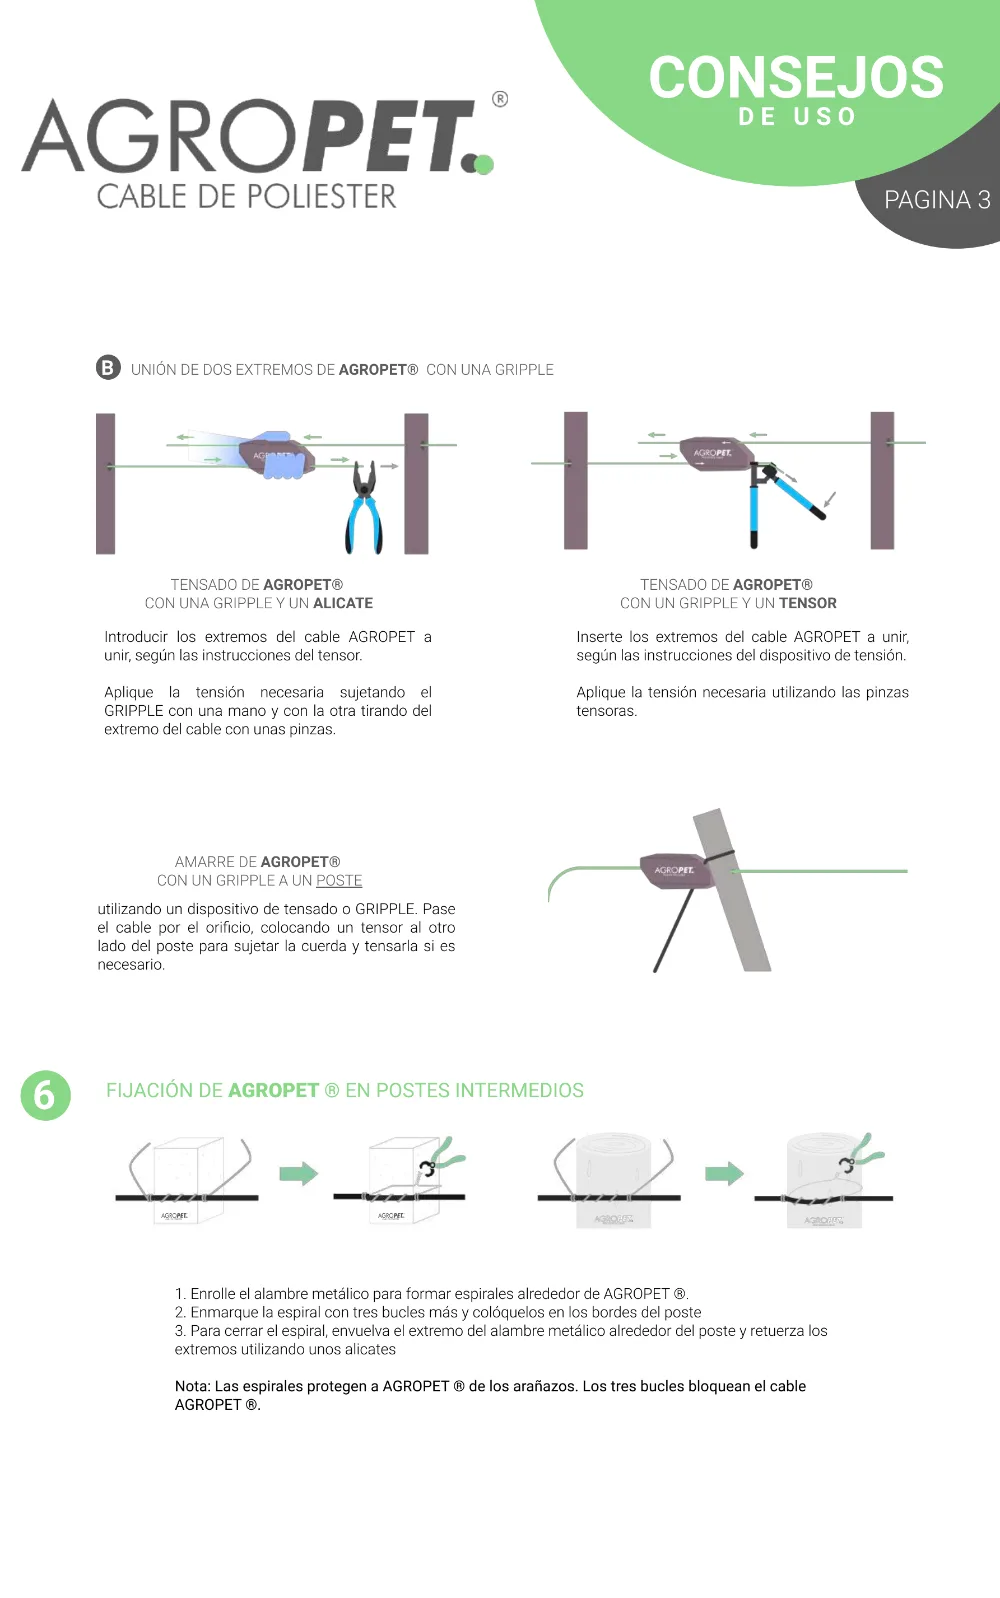
of the line: on a 150 m line, tension 1.5 m. Open the clamp, place the wire between the plates, and pull the block-and-tackle until both pulleys come into contact. Optimal installation tension: 1% of the line. Finish the excess with a knot at the post or with a tensioner / Gripple®.

  • Tensión óptima de instalación: 1 % de la línea.
  • Tie to the end posts
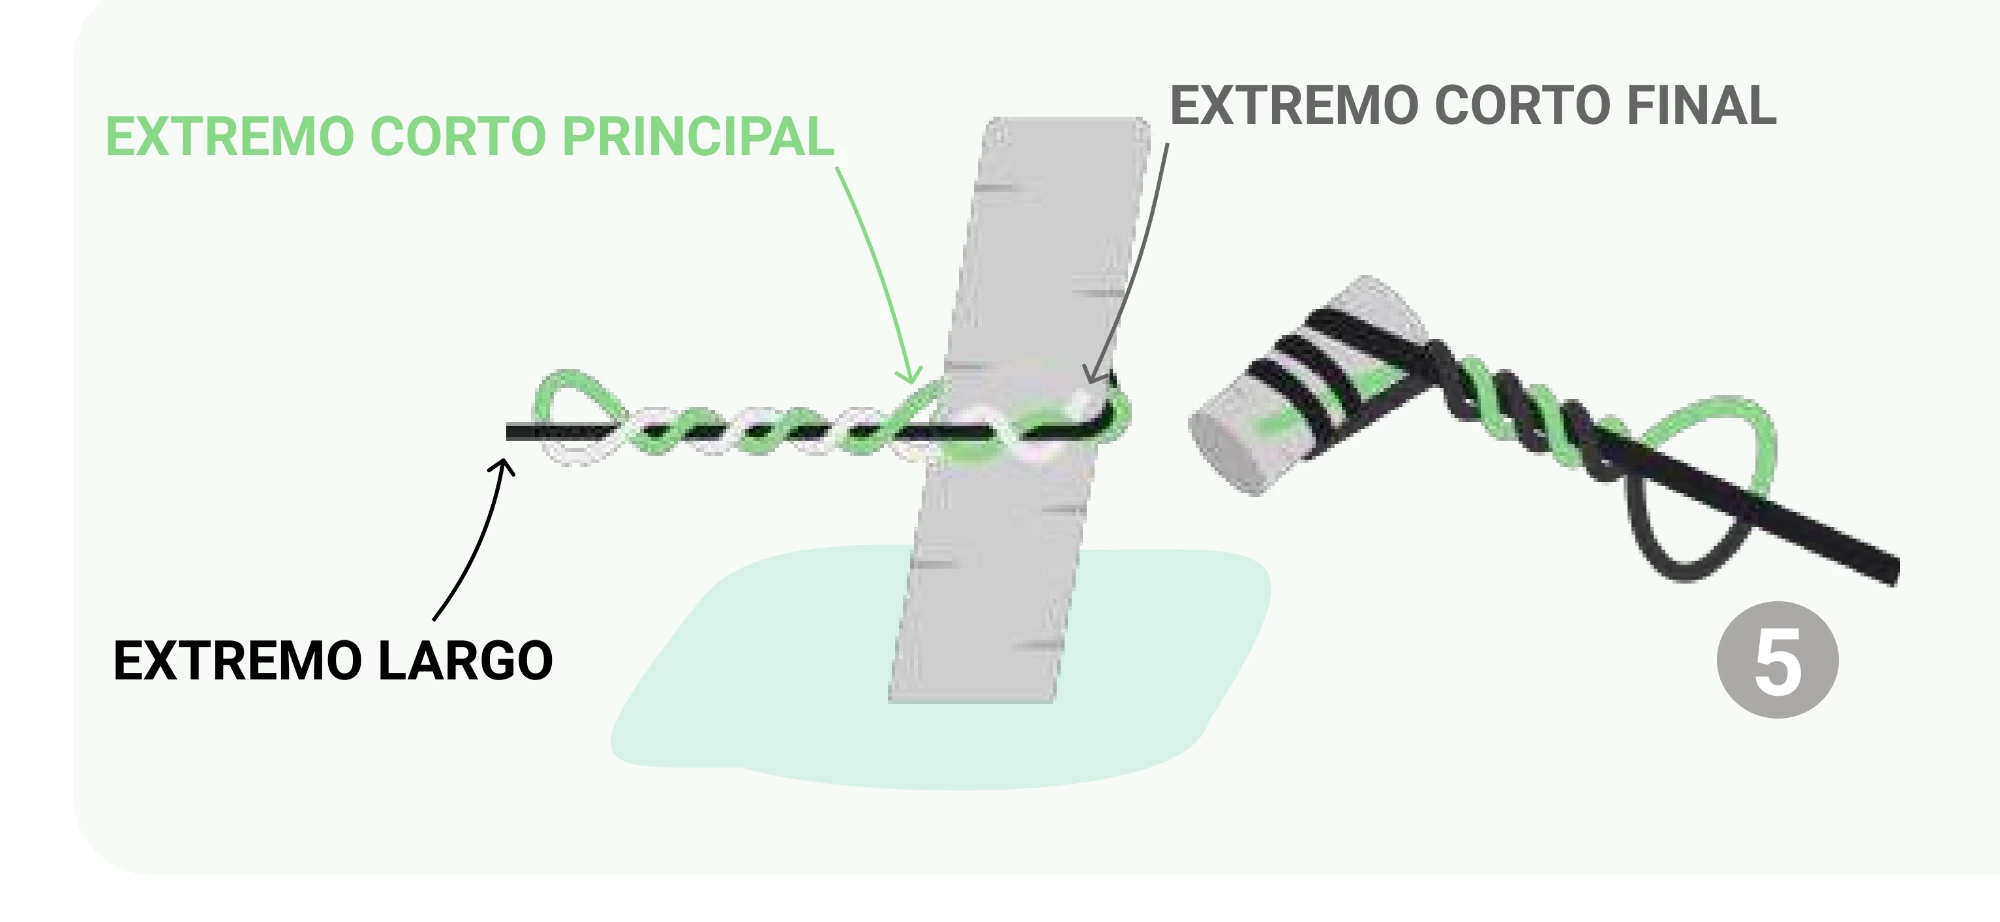
Diagrama del nudo: extremo corto principal, extremo corto final y extremo largo
3

1–1.5 m

of cable for the knot: Wrap the cable 2–3 times around the post. Form 6–7 tight spirals of the short end over the long end.

  1. Make a loop and, working in the opposite direction, form another 6–7 spirals.
  2. Insert the final end into the cable secured to the post.
  3. Haz un lazo y, trabajando en dirección opuesta, forma otras 6–7 espirales.
  4. Fix to intermediate posts
Diagrama: fijación de AGROPET en postes intermedios con alambre y tres bucles
4

three loops

over the edges of the post. The spirals protect the cable from abrasion. The three loops lock the cable in place.

  • Las espirales protegen al cable de los arañazos.
  • Join and connect
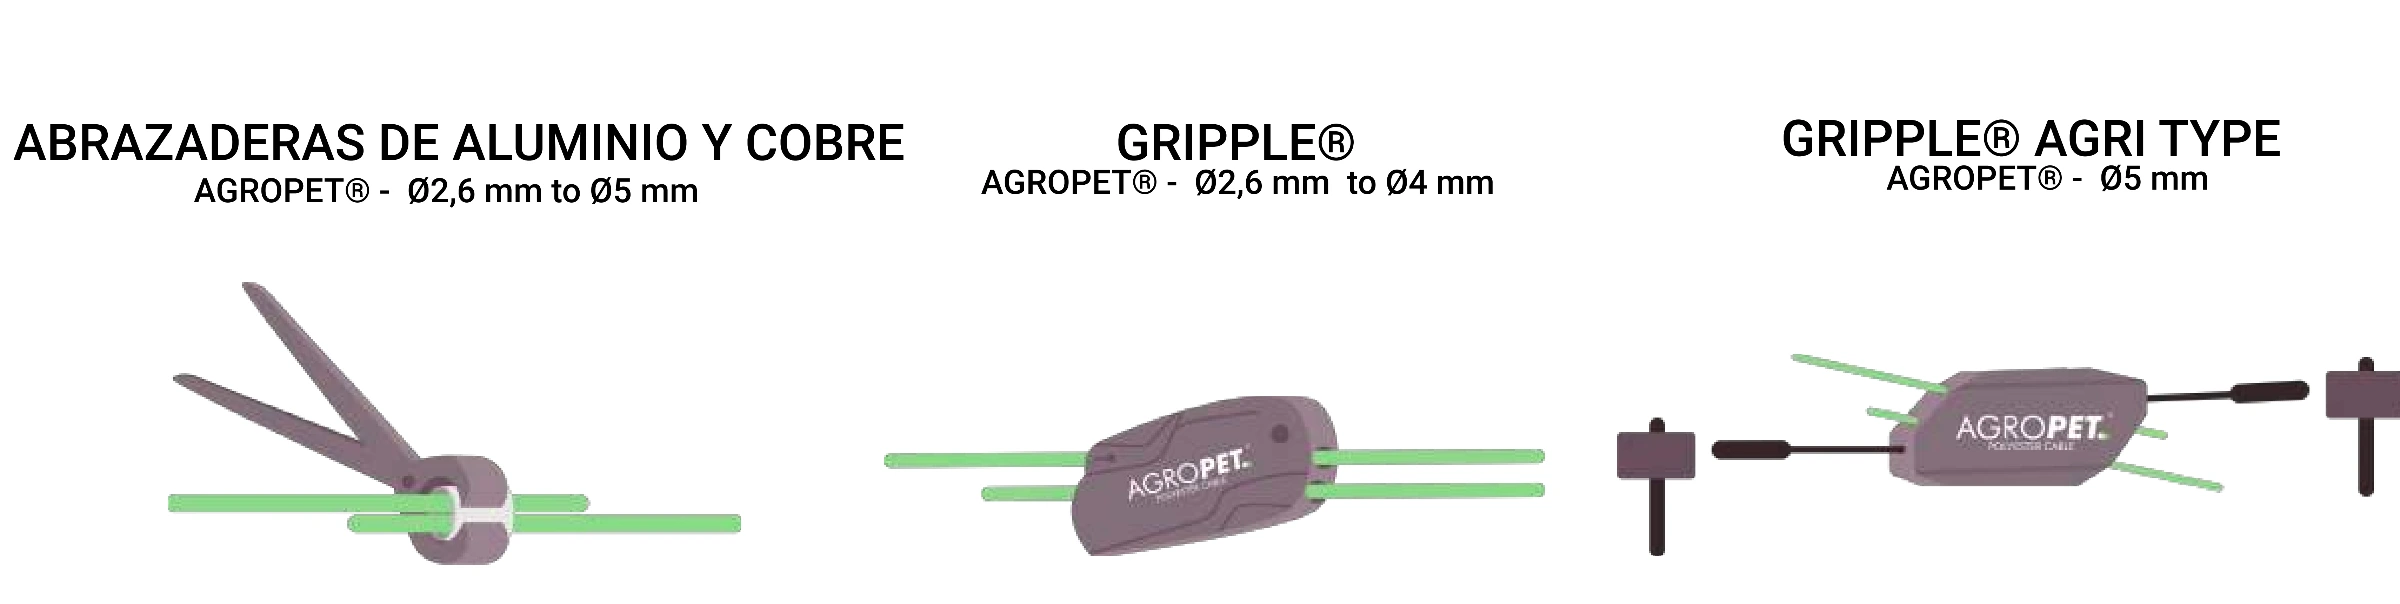
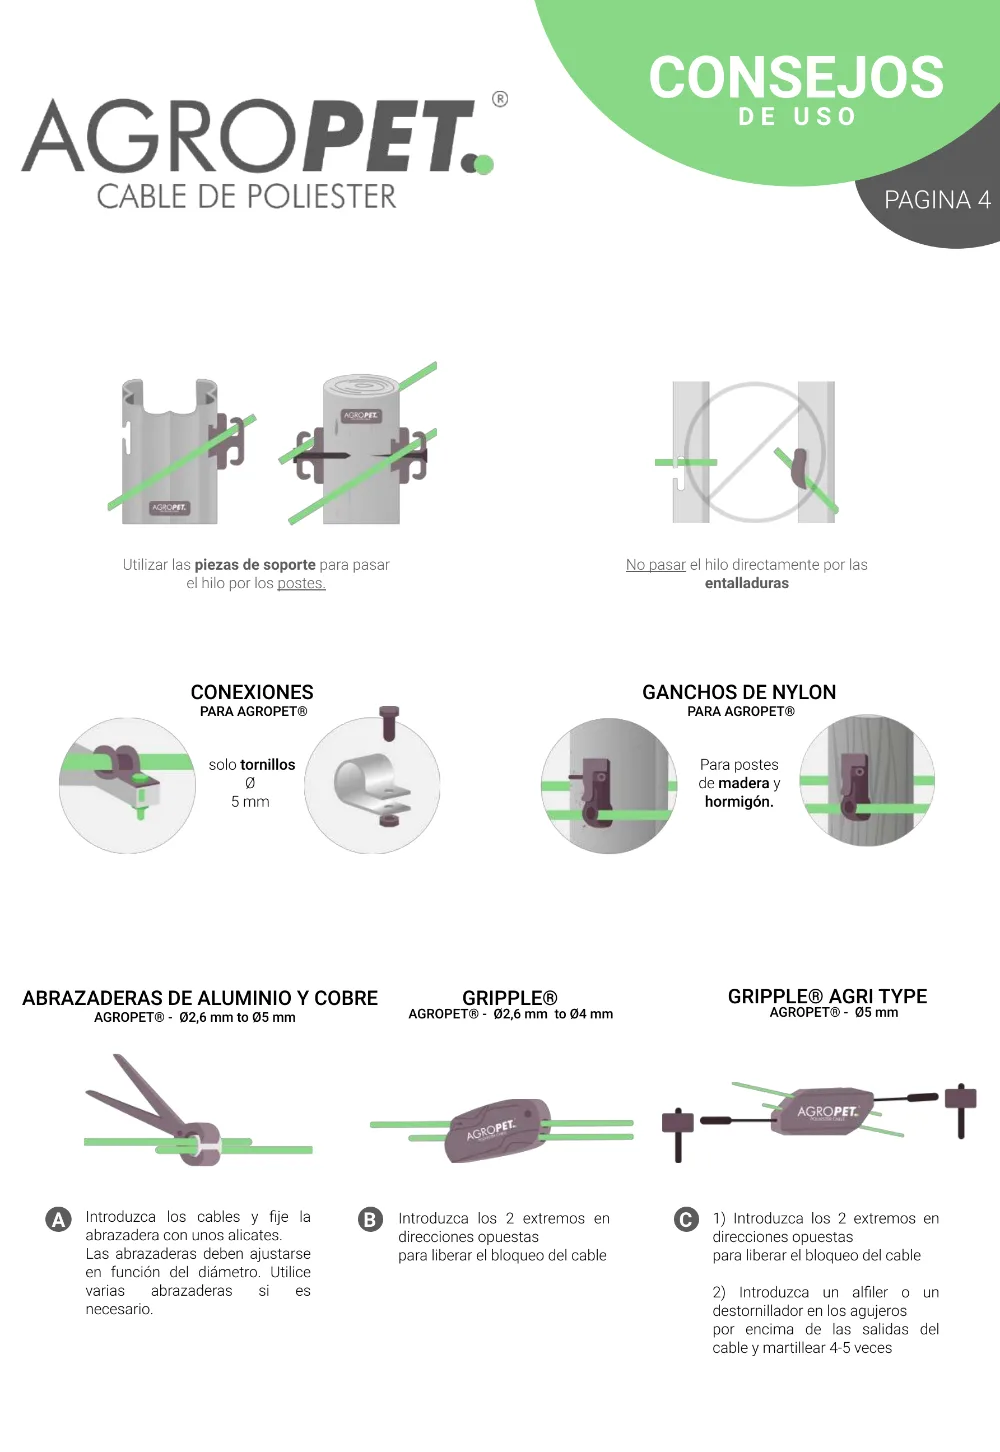
Diagrama de conexiones: abrazaderas, gripple y gripple agri type según el calibre
5

Gripple®

. To run the cable through the posts: Use nylon hooks or aluminium clamps.Do not run the wire directly through the post notches.

  • Adjust clamps according to diameter; use several if needed.
  • What you need
  • Tools for installation

Uncoiler

A stick or a reel dispenser. With a tractor pallet carrier you can uncoil up to 4 reels at a time.

Pulley or tensioner

A tensioning pulley (block-and-tackle) or a tensioner to leave the line at 1% tension.

Gripple® or clamps

Gripple® (Ø 2.6–4 mm), Gripple® Agri (Ø 5 mm) or aluminium and copper clamps (Ø 2.6–5 mm) for joining and finishing.

Nylon hooks

For running the cable through wooden and concrete posts without rubbing against the notches.

Complete manual

All diagrams in the official manual

Uncoiling, tensioning with pulleys, knotting, fixing to intermediate posts, and connections with gripples, clamps, and nylon hooks. Tap a page to open the complete manual.

Todos los diagramas, en el manual oficial

Desenrollado, tensado con poleas, nudos, fijación en postes intermedios y conexiones con gripple, abrazaderas y ganchos de nailon. Toca una página para abrir el manual completo.

AGROPET manual: knotting and fixing to intermediate posts AGROPET manual: connections with gripple, clamps, and nylon hooks Manual AGROPET: nudo y fijación en postes intermedios Manual AGROPET: conexiones con gripple, abrazaderas y ganchos de nailon

We advise you based on your crop, post height, and wind exposure.

Request a quote

Te asesoramos según tu cultivo, la altura de los postes y la exposición al viento.